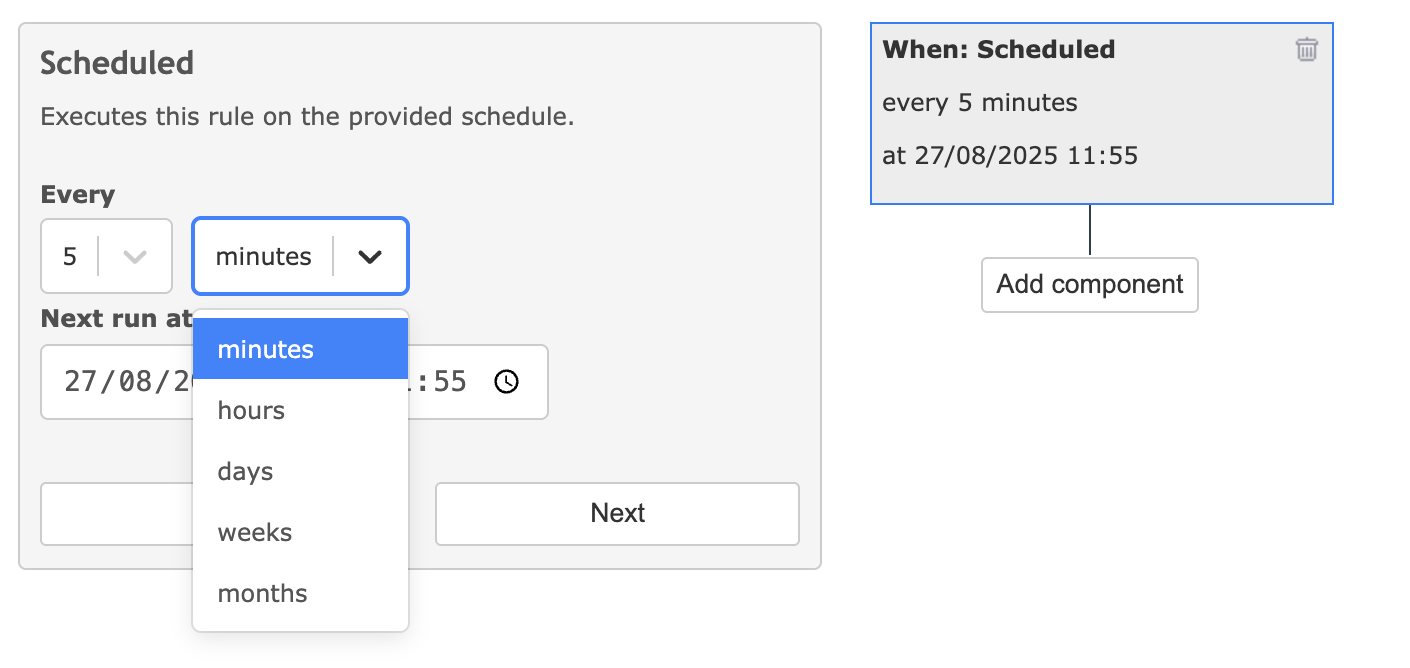
This will check and execute scheduled automations every 5 minutes.
Other installation instructions can be found in the guide on how to install the Automation plugin.
Setting Up Scheduled Automations on Windows Server
Some automation rules use scheduled triggers (e.g., daily tasks, weekly checks, auto-closing stale issues). On Windows Server, use Task Scheduler instead of cron.
Option 1: Using Task Scheduler GUI
- Open Task Scheduler (search for taskschd.msc or find it in Administrative Tools)
- Click Create Task in the right panel (not “Create Basic Task” — we need more control)
- General tab:
- Name: Redmine Automation Scheduler
- Select “Run whether user is logged on or not”
- Check “Run with highest privileges”
- Configure for your Windows Server version
- Triggers tab:
- Click New…
- Begin the task: “On a schedule”
- Settings: Daily, recur every 1 day
- Check “Repeat task every: 5 minutes” for a duration of “Indefinitely”
- Ensure “Enabled” is checked
- Actions tab:
- Click New…
- Action: “Start a program”
- Program/script: cmd.exe
- Add arguments:
/c cd /d C:\\path\\to\\redmine && set RAILS_ENV=production && bundle exec rails runner “AutomationRunScheduledTriggersJob.perform_now” >> log\\cron_automation.log 2>&1 - Start in: C:\\path\\to\\redmine
- Settings tab:
- Check “Allow task to be run on demand”
- Check “Run task as soon as possible after a scheduled start is missed”
- Uncheck “Stop the task if it runs longer than”
- Click OK and enter the credentials for the user account that runs Redmine
Option 2: Using PowerShell Script
Create a PowerShell script run_automation.ps1:
powershell$RedminePath = “C:\\path\\to\\redmine”
$LogFile = “$RedminePath\\log\\cron_automation.log”
Set-Location $RedminePath
$env:RAILS_ENV = “production”
$timestamp = Get-Date -Format “yyyy-MM-dd HH:mm:ss”
Add-Content $LogFile “[$timestamp] Starting automation job…”
try {
bundle exec rails runner “AutomationRunScheduledTriggersJob.perform_now” 2>&1 | Add-Content $LogFile
$timestamp = Get-Date -Format “yyyy-MM-dd HH:mm:ss”
Add-Content $LogFile “[$timestamp] Job completed successfully”
} catch {
$timestamp = Get-Date -Format “yyyy-MM-dd HH:mm:ss”
Add-Content $LogFile “[$timestamp] Error: $_”
}
Then create the scheduled task via PowerShell:
powershell$action = New-ScheduledTaskAction -Execute “powershell.exe” `
-Argument “-NoProfile -ExecutionPolicy Bypass -File C:\\path\\to\\redmine\\run_automation.ps1” `
-WorkingDirectory “C:\\path\\to\\redmine”
$trigger = New-ScheduledTaskTrigger -Once -At (Get-Date) `
-RepetitionInterval (New-TimeSpan -Minutes 5) `
-RepetitionDuration ([TimeSpan]::MaxValue)
$principal = New-ScheduledTaskPrincipal -UserId “SYSTEM” -LogonType ServiceAccount -RunLevel Highest
$settings = New-ScheduledTaskSettingsSet -AllowStartIfOnBatteries `
-DontStopIfGoingOnBatteries `
-StartWhenAvailable `
-RunOnlyIfNetworkAvailable
Register-ScheduledTask -TaskName “Redmine Automation Scheduler” `
-Action $action `
-Trigger $trigger `
-Principal $principal `
-Settings $settings
Option 3: Using schtasks Command Line
Run in an elevated Command Prompt:
batchschtasks /create /tn “Redmine Automation Scheduler” /tr “cmd.exe /c cd /d C:\\path\\to\\redmine && set RAILS_ENV=production && bundle exec rails runner \\”AutomationRunScheduledTriggersJob.perform_now\\” >> log\\cron_automation.log 2>&1″ /sc minute /mo 5 /ru SYSTEM /rl HIGHEST
Verifying the Setup
In Task Scheduler, right-click the task and select Run to test manually
Check log\\cron_automation.log for output
View task history in Task Scheduler (enable it via Action > Enable All Tasks History if needed)
Troubleshooting
Task runs but nothing happens: Verify the Ruby/bundle paths are in the system PATH, or use absolute paths
Permission errors: Ensure the user running the task has read/write access to the Redmine directory
Rails environment issues: You may need to set additional environment variables depending on your Ruby installation (e.g., GEM_HOME, GEM_PATH)
Done!
You’ve just set up a scheduled trigger in Redmine Automation. From now on, Redmine will automatically take care of repetitive time-based tasks—keeping your projects clean, up-to-date, and on track.
Want to see all the other things you can automate? Check the full list of features.